|
|
Post by Johansson on Oct 22, 2014 13:44:52 GMT -5
I started working on the rear fairing last night, lots of styrofoam dust that clings to every damn thing in my workshop but I prefer that to be working outside in the dark and snow.   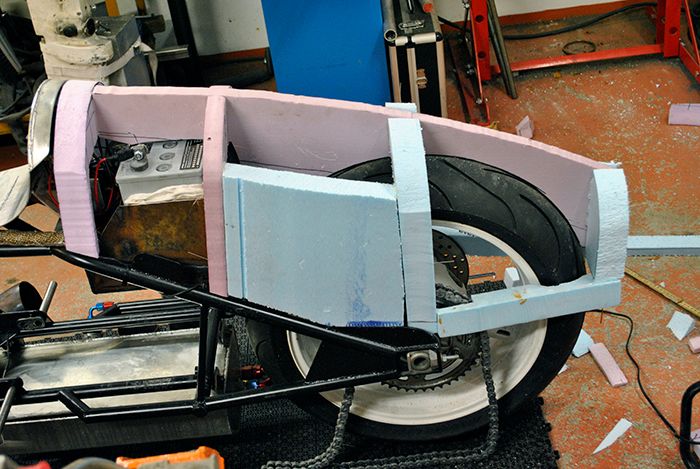 Here the styrofoam pieces are glued in place and it was time to get even dirtier, I used the angle grinder with a scotchbrite disc to get some shape to the fairing, then I continued an hour with sand paper before it was time to hit the bed. 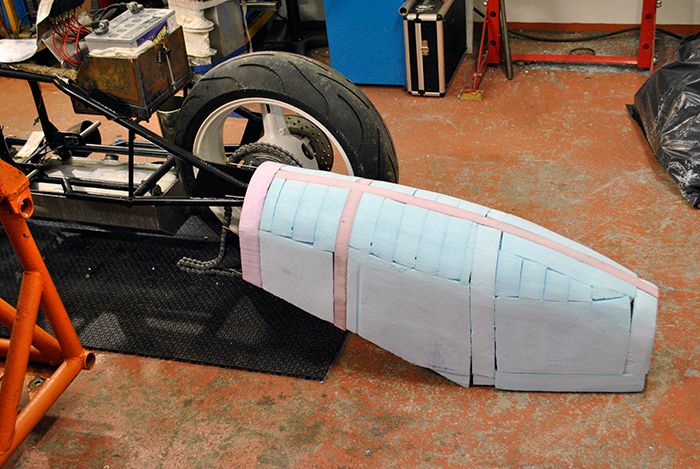 I hope to find a couple of hours tomorrow to continue working on the fairing, I have ordered a length of 10mm ss2348 pipe to make new evaporator tubes so until it arrives I will struggle on with this. Cheers! /Anders |
|
|
|
Post by Johansson on Oct 24, 2014 14:12:53 GMT -5
Last night I made the jig for the evaporator tubes, I wanted to make an inlet radius and four depressions in the walls to make the heat exchange a bit better. 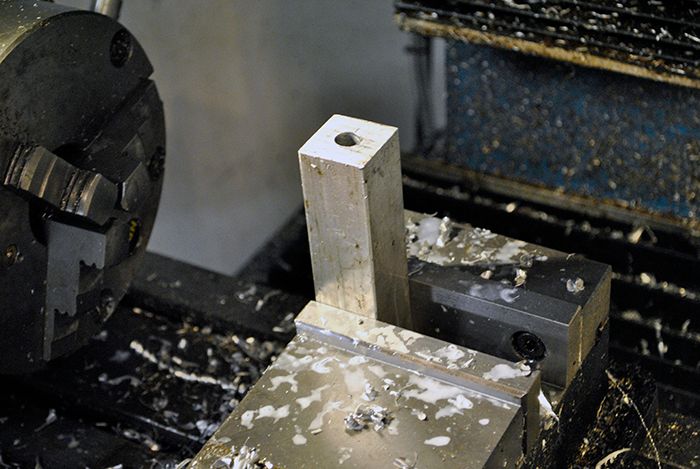 After a couple of hours on the mill and lathe I had these parts on the work bench, the bundle of tubes are the material for the new evaps in 316L stainless. 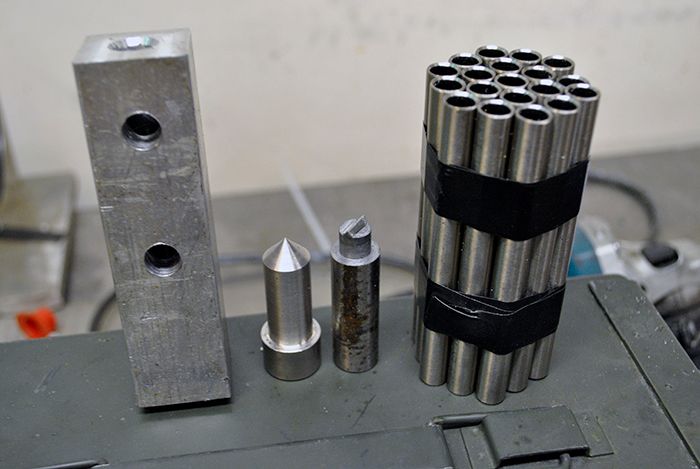 I use a M12 screw to set the length of the tubes when I punch the radius, very easy to adjust the length with it.  Here is the first test evaporator tube after some bashing in the jig, the radius could be a bit larger but other than that it looks ok to me. 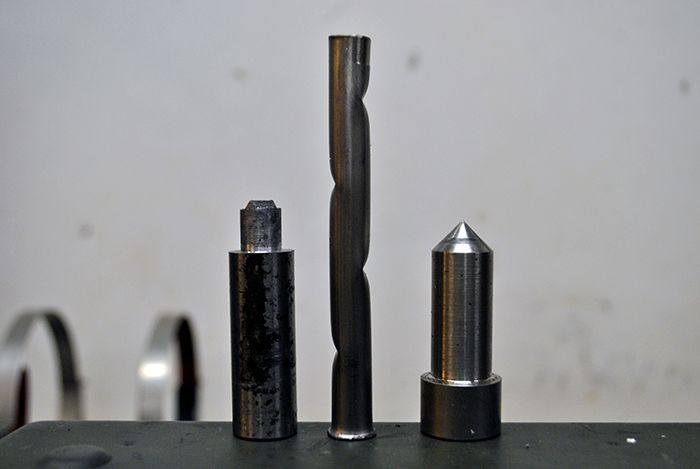 Cheers! /Anders |
|
|
|
Post by smithy1 on Oct 24, 2014 14:39:05 GMT -5
That's perfect Anders...well done Sir..! John will be happy to see those side dimples..! A few of my mini turbines use them too..!
Cheers,
Smithy.
|
|
|
|
Post by racket on Oct 24, 2014 15:02:05 GMT -5
Hi Anders
Nice :-)
A bit of grease on the flairing tool and evap end helps with the bellmouthing .
One down , 17 to go ...............heh heh , being the pedant that I am , when installed in the engine the dimples are all on the "sides" facing each other .
Cheers
John
|
|
|
|
Post by Johansson on Oct 25, 2014 6:23:28 GMT -5
Thanks guys! I finished the evaps this morning, piece of cake when you have made a proper jig for the job. First off I pressed the inlet radius on all 18 pipes... 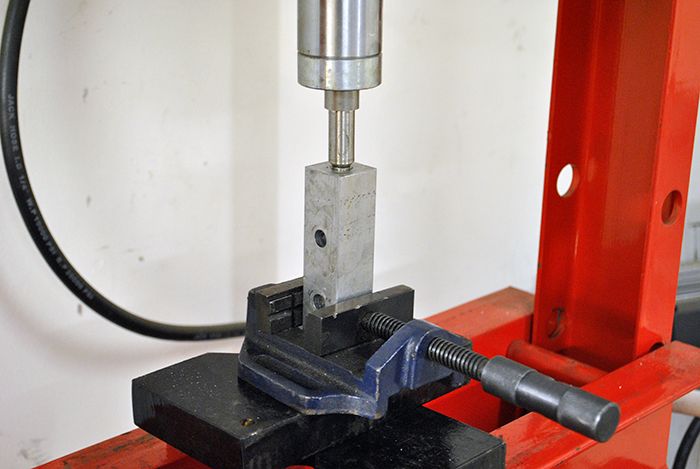 ...and then I took them down to the proper length in the lathe. 100mm long leaves 13mm clearance to the combustor wall. 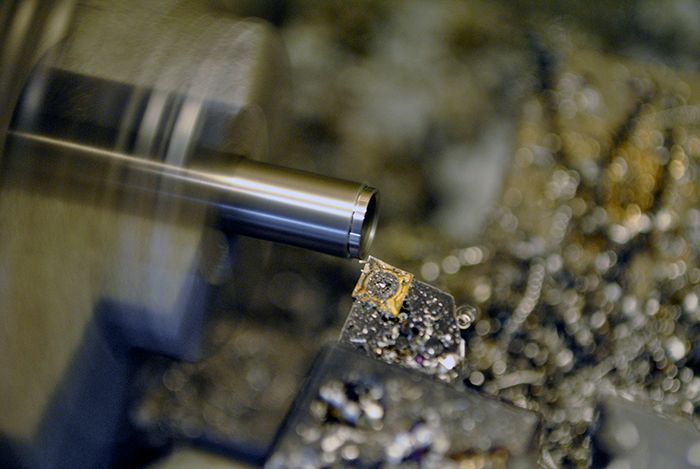 While working on pipes you really need to listen to some proper music for the best result.  With "Hits from the Bong" at full throttle on the stereo I punched the four side dimples (good word for them Smithy) in all evap tubes. 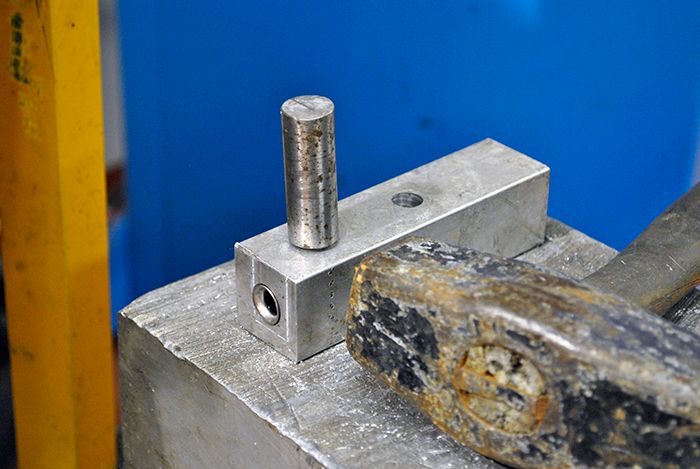 18 evaporator tubes ready to be installed! 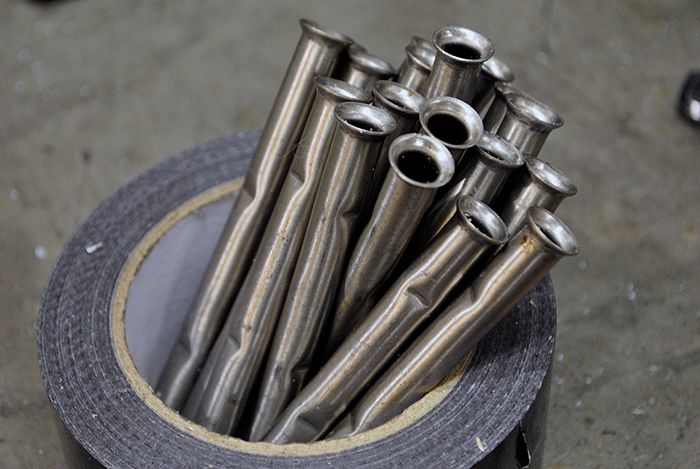 I removed the old tubes from the NGV housing and milled a radius to the holes... 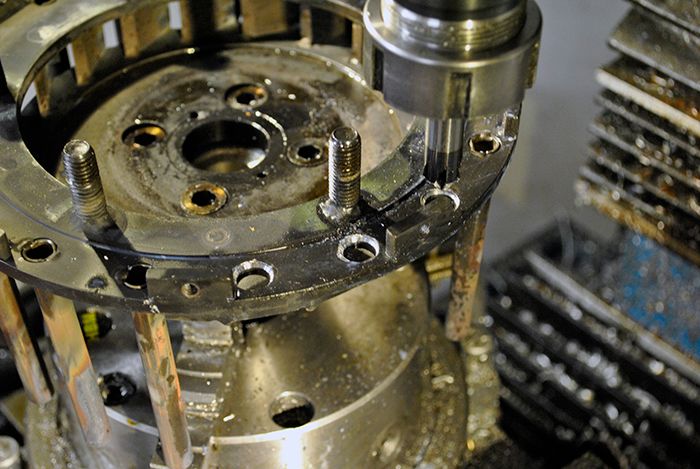 ...and fitted the new evaporators. 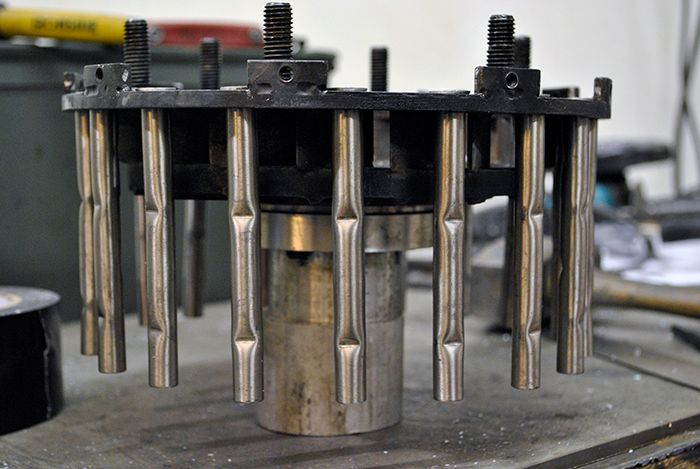 The dimples are placed so the syringe jet hits the tube wall just before the first one. It would be really interesting to have a look in there somehow to see what is happening during combustion, all we can do is make qualified guesses on what is going on. 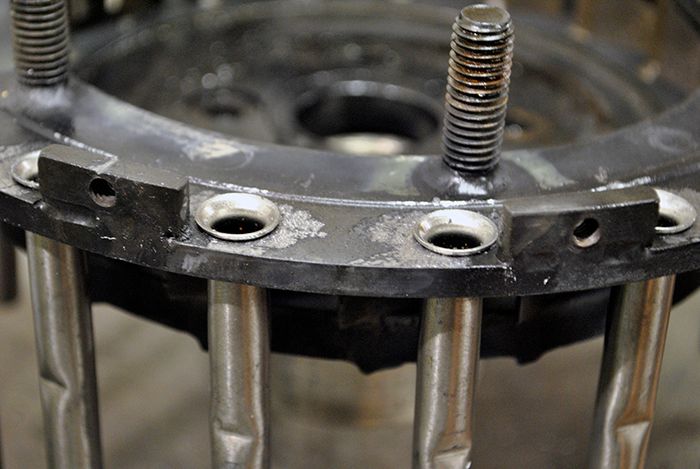 Cheers! /Anders |
|
stevep
Veteran Member

Joined: November 2012
Posts: 120
|
Post by stevep on Oct 25, 2014 7:51:05 GMT -5
"The dimples are placed so the syringe jet hits the tube wall just before the first one. It would be really interesting to have a look in there somehow to see what is happening during combustion, all we can do is make qualified guesses on what is going on."
Yeah, I keep thinking there's a lot of info in the rocket literature that would be helpful, but most of it assumes the fuel is injected at pretty high pressure. Still, there's some good info on how long it takes kerosene to evaporate based on drop size, temperature, air flow, etc. so maybe some of it would be applicable. At the very least someone with some CFD expertise (sadly, not me) could do some flow analysis on the dimples to see how the air flow breaks up the fuel.
I suppose you could do some cold flow work--use clear plastic tubes (make the dimples with a heated die) and run cold air through them to see what the kerosene does; maybe you could get some comparative results (longer tubes vs shorter ones, larger diameter vs smaller, more dimples vs fewer, etc.) that would shed some light on the issues.
Anyway, nice work on this project--you keep amazing (and inspiring me) with the amount and the quality of the work you do!
OK, back to lurk mode :-)
--Steve
|
|
|
|
Post by Johansson on Oct 25, 2014 8:26:24 GMT -5
Thanks a lot Steve! I am lurking around in your thread as well but feel like I have little to contribute to it with all the fancy electronic stuff being done there. |
|
ashpowers
Veteran Member
Joined: February 2011
Posts: 207
|
Post by ashpowers on Oct 25, 2014 9:08:28 GMT -5
Pick it, pack it, fire it up! LOL, I just got a whole new image of you Swedes building turbines out in the shed... ;-) I commend you on the clever construction of the tooling used to make these parts! The difference this will make spread over so many evap tubes is quite certain to improve her performance by a notable amount in some regard or another. At the very least it will significantly reduce the possibility that your evap system's performance is related to the high TOTs you've been observing... Looking forward to your next testrun results. |
|
|
|
Post by Johansson on Oct 25, 2014 12:35:11 GMT -5
Pick it, pack it, fire it up! LOL, I just got a whole new image of you Swedes building turbines out in the shed... ;-) I commend you on the clever construction of the tooling used to make these parts! The difference this will make spread over so many evap tubes is quite certain to improve her performance by a notable amount in some regard or another. At the very least it will significantly reduce the possibility that your evap system's performance is related to the high TOTs you've been observing... Looking forward to your next testrun results. I´ve actually never come in contact with any drugs at all during my 33 years, except alcohol of course. We swedes are raised to say no to smoking pot but it is considered perfectly normal to be piss drunk two days a week... Thanks! My grandfather made lots of jigs for the variety of projects he was doing, I didn´t get it then since I was only 9 when he passed away but when I got older I started to appreciate his way of doing things. Jig making would be a fun job if there was any money to be made from it. I am very excited about the upcoming test, the new evaporators should be a definite improvement to the old ones and hopefully it will show on the TOT gauge. Cheers! /Anders |
|
|
|
Post by racket on Oct 25, 2014 22:29:57 GMT -5
Hi Anders
Nice work :-)
LOL.........it'll be interesting to see if the new evaps make a difference , they can't hurt the process , heh heh , you've got your dipples going in a "circumfrential" orientation , mine were more on a "radial" , .............any reason why you did it that way .............I've forgotten why I orientated mine the way they are :-(
Cheers
John
|
|
|
|
Post by finiteparts on Oct 25, 2014 23:14:08 GMT -5
Hi Anders,
Nice work as always!
I guess it is just the engineer in me and the countless hours looking up stress concentration factors in Peterson's book, but I would have thought that a small rounded bump would be better than a sharp bend, from a crack initiation standpoint.
John, did you put them radial because of the potential of radial flex causing cracking and the fact that the bend would actually stiffen the "beam" in the radial sense, if it was radially oriented? If they are oriented in a radial sense, it seems less likely that the engine will see substantial torsional vibes and thus less flex in the plane of the "notch". But, the possibility of seeing radial vibrations is quite high and with the vaporizer tube being a cantilever beam, vibes in the plane of the notch will also be more likely.
Like I said, back when I was designing hot parts for combustors, we always tried to blend things out, reduce any notches that would cause a stress concentration, so I am biased on this discussion. I forget that these parts don't need to meet 25,000 hour lives!!
By the way, was the turbine inlet temp probe reading off the scale (that's what it looked like on the video0 and so you left it off?
- Chris
|
|
|
|
Post by racket on Oct 25, 2014 23:56:22 GMT -5
Hi Chris
Now you've got me thinking ...........nope , not for vibration , more for heat transfer to the fuel I'd imagine , but it could have been just because I liked the look of it that way and as they worked OK for the FM-1 engine I carried it on for the others .............I really should have kept more inclusive notes.
Cheers
John
|
|
|
|
Post by Johansson on Oct 26, 2014 5:10:21 GMT -5
Hi John and Chris,
I got the dimples arranged this way because the syringes are pointing inwards toward the shaft tunnel, so the ejected jet of kero hits the evaporator just upstream the first dimple.
The TIT probe was a cheap stainless open end one that burned out during the run, it might have been a hot start that killed it but if not it is an indication that the combustion occurs a bit late in the engine.
Cheers!
/Anders
|
|
|
|
Post by racket on Oct 26, 2014 15:17:18 GMT -5
Hi Anders
LOL.........thats as good a reason as any :-)
Heh heh , just had a look at my 10/98 pics , my injectors are bent "circumferentially" , looks like we have both come to the same conclusion for the orientation.
Cheers
John
|
|
|
|
Post by Johansson on Oct 26, 2014 16:46:08 GMT -5
That feels like the right way of doing it, we´ll see how it will work later. I got a few hours for myself tonight so I tacked the evaps in place and was just about to align them when I took this picture. 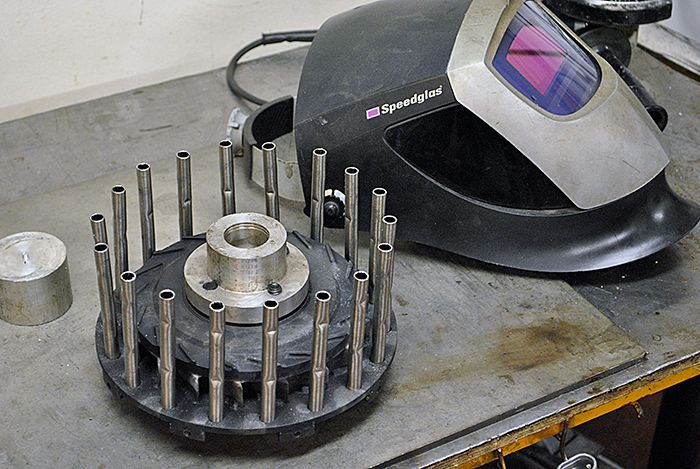 With the evaps aligned and welded in place I could fit the combustor to the NGV housing again, I really thought this would take longer to get done but everything from ordering the material to the jig making went really well. 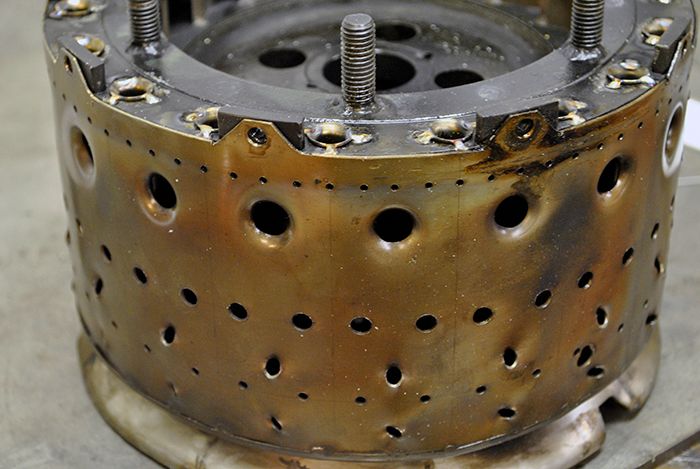 Another thing that needed fixing was the partially blocked injectors, with compressed air blowing in the direction of the flow I managed to open up one of the syringes but the second one needed to be replaced. 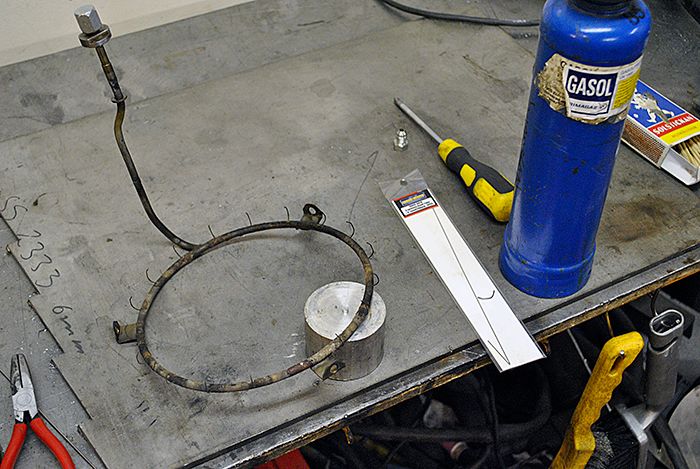 With the new syringe injector silver soldered in place I could do the propane test again and now it looks much better. 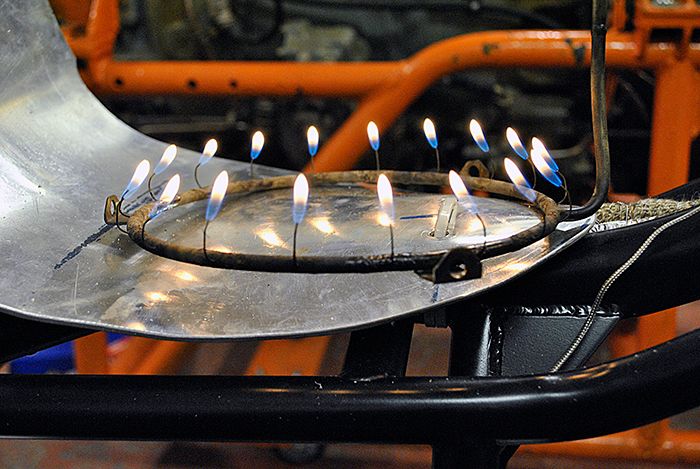 Finally I put some more filler on the plug for the rear fender, I have to take it in steps so the filler have time to set properly. 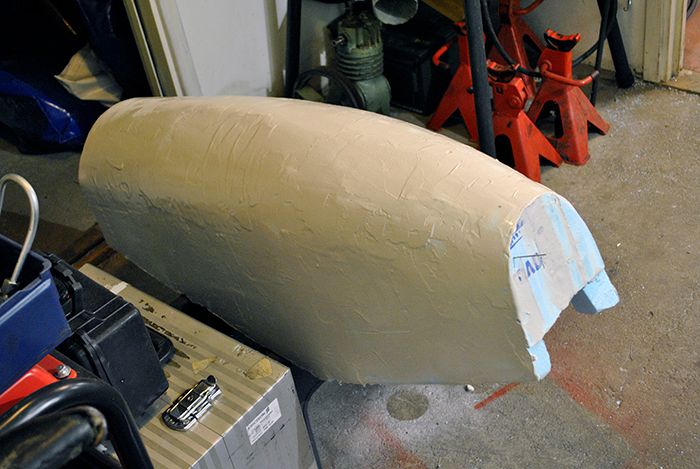 Cheers! /Anders |
|


