|
|
Post by Johansson on Dec 20, 2017 13:24:58 GMT -5
Well the fiberglass bellmouth idea was shit, the small radius made it darn near impossible to get the fiberglass cloth to stick to the foam plug. I tried using rope to force the cloth against the plug while the epoxy was curing but I decided to drop the idea before I´d start yelling and throwing stuff around...   I think I will try 3D printing the bellmouth from PLA instead of nylon to cut down the printing time some. I just have to order some filament first since I am just about out of stock. I did manage to get something useful done last night, I made the air straightening vanes that fits just downstream the fan.  John told me what angles the leading edges of the vanes should have and I did my best to make them so, a bit difficult to measure the angle correctly I think I got it right.  I welded the whole jet duct together and fitted it to the turbofan, my original plan was to make a diffusing cone on the inner liner but I figure that this way it will cause some turbulence and assist in fuel/air mixing for the afterburner.  Cheers! /Anders |
|
|
|
Post by madrocketscientist on Dec 20, 2017 17:19:40 GMT -5
Anders,
Part of the fiberglass problem may be the binder in the glass cloth. Most of the the time the binder is formulated to dissolve with polyester resin. The epoxy doesn't dissolve the binder and the cloth remains stiff and really doesn't want to hold to the curve. I find that you have to wait much longer and work the cloth more to get it to wet out properly with epoxy.
Have you considered vacuum bagging the plug after you glassed it, pressure from a vacuum cleaner would be enough to hold the glass in place.
Shannon
|
|
Deleted
Joined: January 1970
Posts: 0
|
Post by Deleted on Dec 21, 2017 2:52:53 GMT -5
Hi Anders Looking real good Just an idea, that area in the center of the straightening vanes would work well are pressure dump for the afterburner, guessing you be blanking it with a plate closes to the bearings The bell mouth, you can get impregnated carbon sheet.... adhesiveness, you could try that, them vacuum bag it to cook, seen kit on Ebay But things are looking good, and coming together real nice, so looking forward to seeing it run All The Best Andy |
|
|
|
Post by Johansson on Dec 21, 2017 2:59:59 GMT -5
Shannon: That would probably work much better, vaccum bagging it. I still think that I will skip this idea since a 3D printed part will do the job just as good without all the mess. I really need the time for making other things on the iceliner as well so I think I´ll assign this job to the printer. Andy: Thanks! I haven´t given the inner liner any more thought but the plan was to leave it open just as it is in the picture. |
|
Deleted
Joined: January 1970
Posts: 0
|
Post by Deleted on Dec 21, 2017 3:16:41 GMT -5
HI Anders
All i was thinking, was if you put a disc.... say half way, to form a void, the dump would help hold the flame, i remember us talking
that you would put the fuel in at the fan, but a little extra mixing and holding area would be a good thing, on the classic mini, when it had an afterburner..... all that was used basically was a pan, making a void and pressure dump.... just an idea
All The Best
Andy
|
|
|
|
Post by Johansson on Dec 21, 2017 3:53:51 GMT -5
Actually we are a bit unsure how to best fuel the afterburner, having it sucked in through the fan is one way of doing it but we are starting to think that injecting it into the afterburner through spray nozzles from pressurized tanks might give a more controllable system with less risk of fuel being spilled inside the vehicle.
This would also eliminate the risk of damaging the fan blade leading edges from passing 0.3 liter of liquid fuel through it every second.
We will have time to think this through since the afterburner won´t be finished until next years race, this year we´ll just make the duct and fit a jet cone extension for dry thrust.
|
|
|
|
Post by racket on Dec 21, 2017 15:00:42 GMT -5
Hi Anders
Theres always the centrifuging method of fuel atomisation , make up some sort of "cup" arrangement at the fan outlet hub that fuel is fed into , the high speed rotation of the shaft centrifuges the fuel to the outer wall and through the small injection holes, a similar arrangement to that used on a number of commercial aero engines .
Cheers
John
|
|
|
|
Post by Johansson on Dec 27, 2017 14:32:05 GMT -5
I hope you all had a great Christmas guys! The work on the iceliner is progressing nicely, Olov has been doing a shitload of work on the chassis but since his Photobucket account has expired he can only post pictures in our Mobacken Racing Facebook page. I haven´t been totally inactive myself but mostly I have been discussing rotor balancing and ceramic bearings with different companies, so not very much worth making a post about. Cheers! /Anders |
|
|
|
Post by Johansson on Dec 27, 2017 14:35:17 GMT -5
Hi Anders Theres always the centrifuging method of fuel atomisation , make up some sort of "cup" arrangement at the fan outlet hub that fuel is fed into , the high speed rotation of the shaft centrifuges the fuel to the outer wall and through the small injection holes, a similar arrangement to that used on a number of commercial aero engines . Cheers John Hi John, That is another way of doing it, I remember reading about a drone engine that had a hollow rotor shaft into which the fuel was injected and then flung out through holes in the shaft into the combustor. We will list all of the different fuel supply ideas and think them through properly, we have a whole year to figure out how best to do it so no rush. Cheers! /Anders |
|
|
|
Post by Johansson on Dec 28, 2017 17:20:51 GMT -5
Olov is working his arse off with the rear chassis suspension, he is making a very serious 4-link suspension with adjustable dampers and a Watts linkage. 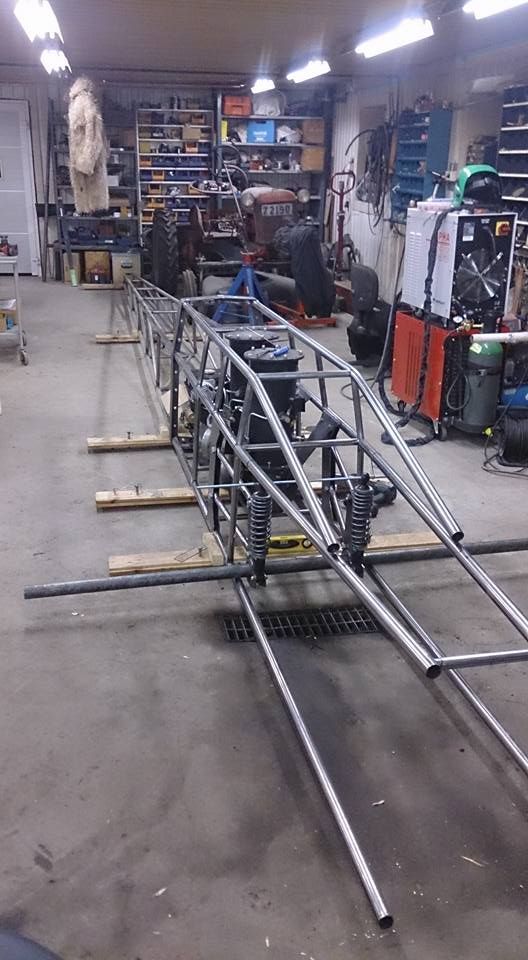  Once he is finished we will bring the rear end to my workshop where I can start making the turbofan linkage, afterburner assembly and so on and so forth. I´ve started making the afterburner duct while waiting for the chassis to arrive, the rear end of the AB has a sliding fit onto the fan duct with a rubber seal (it will be exchanged for a graphite seal next year when the afterburner will be lit) that will make sure that no heat expansion force from the afterburner will reach and possibly damage the fan.  Tonight I cut out the jet nozzle from a sheet of 1mm stainless and rolled it.  The main afterburner body will be made once we know exactly how long we can make it and still fit it inside the chassis.  Cheers! /Anders |
|
|
|
Post by turboron on Dec 28, 2017 21:02:46 GMT -5
Anders, I like the Farmall Cub in the corner of Olov's shop. It brings back memories of my 16 hour farm days driving Farmall F20s, Hs and Ms.
Thanks, Ron
|
|
|
|
Post by Johansson on Dec 30, 2017 12:58:47 GMT -5
I got a spool of filament for the 3D printer a couple of days ago and last night I put it to good use, I did a 14 hour bellmouth print that turned out really well.  I just need to sand it down a little to remove some burr from the support material, really nice to have this part done since it is a pretty darn vital piece of the engine.  To celebrate I heated up the garden sauna for myself and my little girls, I got a good laugh seeing them running naked outdoors in -14°C throwing snow at each other...  Cheers! /Anders |
|
|
|
Post by jetjeff on Dec 30, 2017 14:17:42 GMT -5
Hi Anders,
The bellmouth looks good.
It's brutally cold here in Michigan too,,,what the heck happened to global warming?
I've been getting my iceboats ready for some hardwater sailing.
Regards
Jeff
|
|
|
|
Post by Johansson on Dec 30, 2017 14:54:01 GMT -5
Thanks Jeff, as long as I make some kind of heat shield between the turbine scroll and the bellmouth I think it will work fine.
This is the first winter since we moved here that actually can be called a winter, earlier it has mostly been rainy and windy mixed with the occational snowfall and -30°C days.
Cheers!
/Anders
|
|
|
|
Post by Johansson on Dec 31, 2017 9:34:30 GMT -5
I spent an hour this morning cutting the fan cover spokes to their intended shape and gave them a general smoothing down with the angle grinder sanding disc.  With that done I could assemble the turbofan to see how everything will look when it is finished, I have some thinking to do before designing the fan mounts so they don´t mess with the air intake too much. 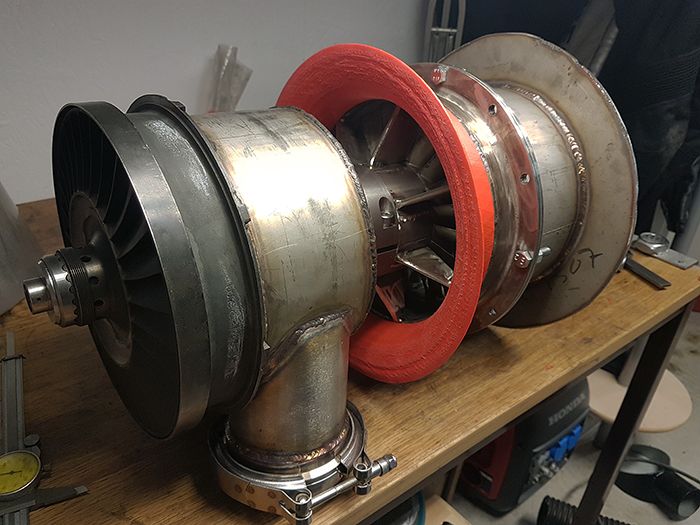 I will also have to fit a sheet metal heat shield so the radiant heat from the turbine housing won´t melt the bellmouth.  Happy new year friends! /Anders |
|


